Once the customer has their thermal printer installed and configured, a logo will need to be added.
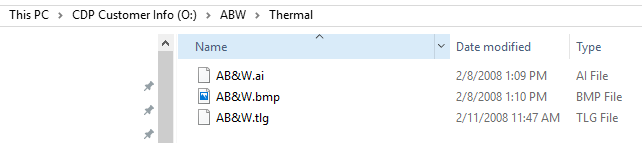
Navigate to the CDP Customer Info (O:), and chose the customer that you are adding a logo for (IE: The Credit Union Name).
Once in that Credit Unions' file, click Thermal
The only file that will work properly for a logo on the thermal printer receipt is the .tlg file.
Now that you have verified the customer has a properly formatted logo available for use, navigate to the CDP Thermal (T:)
Chose Software and Scan Utilities
Chose Ethernet Scan Utilities (IF it is an ethernet connection (most customers are ethernet connected)
Chose Ethernet NO MASK Scan Utility (the .zip files are to send to the customer, if needed)
Chose MultiConfig_v2.7b.no.masking.exe

A new box will appear, click Scan.
Choose the correct IP address, then Logo Upload
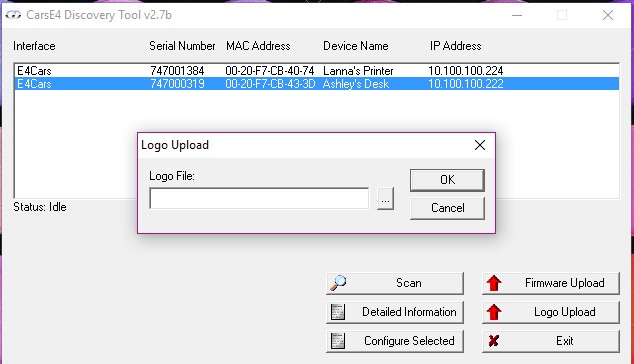
Now, following the pre-determined path found on the first step, upload the logo, using the .tlg file
Once this is completed, a test receipt will want to be printed, to ensure the logo shows up and is properly aligned.
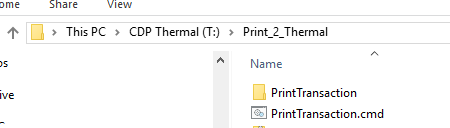
Choose Print_2_Thermal
Choose PrintTransaction.cmd
Once you double click, a black box will appear, asking for the IP address of the printer you are sending the receipt to.
Type in the IP address, and a receipt will generate and print, which will include your new logo
Please Note: CDP can only troubleshoot the Epson models we support (Currently versions 4 and 5) BUT if a customer calls with a version 1-3 issue, CDP will still attempt to resolve the issue, with the limited resources that are left to troubleshoot the earlier versions.